
RabbitMQ Lab — Tutorial
Foreword: When you first read the different steps, we suggest that you do not study the details, i.e. that you do not open the "details" tags.
Launching the RabbitMQ broker
Get the Docker container for RabbitMQ:
Here follows some explanations about the commands to launch and control the RabbitMQ server (a.k.a. broker). Please refer to these short explanations when you want to know more when you read the JAVA code excerpts and the scripts:
-
The server is launched with the Docker command:
The port 5672 is the port for the access to the broker and the port 15672 is the port for the access to the management plugin of the broker.$ docker run -itd --name rabbitmq -p 5672:5672 -p 15672:15672 rabbitmq:4.0.0-management
We use the container 4.0.0-management in order to include the management plugin. -
The container just launched includes also a shell command
(bash). Therefore, the server is controlled with
the Docker command:
The utilitary command rabbitmqctl (Web page here) is a shell script, with the following arguments:$ docker exec rabbitmq rabbitmqctl <args>
- "status": to display broker status information such as the running applications, RabbitMQ and Erlang versions, OS name, memory and file descriptor statistics,
- "stop": to stop the Erlang node on which the RabbitMQ broker is running,
- "reset": to return the RabbitMQ broker to its virgin state (to be done after stopping the RabbitMQ broker with stop-app),
- "stop-app": to stop the RabbitMQ application (the broker), leaving the Erlang node running,
- "start-app": to start the RabbitMQ application (the broker) on the Erlang node,
- "list_queues": to display queues details such as their names.
- "list_exchanges": to display exchanges details such as their names.
- "list_bindings": to display bindings details such as the routing keys.
-
The RabbitMQ broker is stopped and the Docker container is
remove using the following commands:
$ docker stop rabbitmq $ docker rm rabbitmq
Check and configure JAVA
Get the source code of the tutorials prepared by the RabbitMQ team
In this lab, we use the tutorial steps prepared by the RabbitMQ team. We have gathered and "mavenized" the code in Maven modules. The source code of the tutorials is provided in Maven modules in the project csc-mw-examples on the platform https://gitlabense.imtbs-tsp.eu.
If you cannot or do not want to use Git, the examples are also available in this archive. Only when using the archive, you should proceed as follows:
Before starting the tutorial, compile all the examples.
Follow the tutorial prepared by the RabbitMQ team
The RabbitMQ tutorial contains seven steps. We reorganise it to have less of them. This is done by introducing the concepts of the first steps in this page. As a consequence, the corresponding text is from RabbitMQ Web pages and is in italics.
Producer, exchange, consumer, queue, routing key, and binding key
The first concepts of producer, exchange, consumer, queue, routing key, and binding key are depicted in the following figure. The text following the figure presents these concepts.

Producing means sending. A program that sends messages is a producer. A producer sends messages to an exchange. Consuming means receiving from a queue. A consumer is a program that mostly waits to receive messages.
Producers send messages to exchanges. An exchange is a matching and routing engine: It inspects messages (headers, and more especially what is called, in the AMQP vocabulary, a routing key), and decides how to forward these notifications to message queues (the decision being made using subscription filter's data, and more especially what is called, in the AMQP vocabulary, a binding key) that is provided by the consumer. We will see that they are several types of exchanges, i.e. different matching and routing engines.
Although messages flow through RabbitMQ and your applications, they can only be stored inside a queue. A queue is only limited by the host's memory and disk limits. It is essentially a large message buffer. Many producers can send messages that go to one queue, and many consumers can try to receive data from one queue.
Note that the producer, consumer, and broker do not have to reside on the same host. Indeed in most applications they don't. An application can be both a producer and consumer, too.
In all the JAVA code excerpts, clients, either producers or consumers, open a connection to the RabbitMQ server:
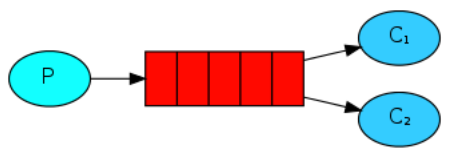
Exceptionnaly, i.e. not usually, producers can connect to queues and directly deposit messages into queues, i.e. without the messages going through an exchange. This functionality is demonstrated into Step 1 of the RabbitMQ tutorial:
see the Web page of Step 1, and the corresponding directory RabbitMQ-Tutorial-Step1.
Here follows the picture of the architecture for this step.

At your convenience, and optionally , you can read these Web pages and run the corresponding code examples:
We now propose to comment the last two lines, which stop and remove the container, and to execute again ./run.sh. Next, by executing the command "docker exec rabbitmq rabbitmqctl list_queues", let us now observe that the queue hello that has been created still exists in the server even if there is no more producer or consumer. This is why we preventively stop and remove the container in all our scenarios.
The code of the example is in directory src/main/java/eu/telecomsudparis/rabbitmq/tutorial and the code of the test is in directory src/test/java/eu/telecomsudparis/rabbitmq/tutorial. You can also import the Maven project in your favourite JAVA IDE, e.g. Eclipse, for browsing the code of the example. In addition, observe that the test is an integration test because the name of the classe ends with IT, namely ScenarioIT.
NB: generally speaking, in case of problem "Connection refused" when executing a scenario, firstly, check that you use the docker container that includes the plugin rabbitmq_management, secondly, try a greater value in the sleep 10 command in shell script run.sh: currently, we assume that the brocker in the container starts in less that 10s.
Next, the authors of the RabbitMQ tutorial present a first list of interesting properties of queues in order to answer the following questions: How to use a queue as a backlog of work, i.e. of messages to treat, and to implement round-robin dispatching with several consumers attached to the shared queue? How to keep a sequence of messages in the queue until the consumer sends an acknowledgement message? How to make sure that even if the consumer dies messages are not lost as they can be persisted by the broker? And, how to organize fair dispatching with a prefetch countproducer? All these questions are the subject of Step 2 of the RabbitMQ tutorial:
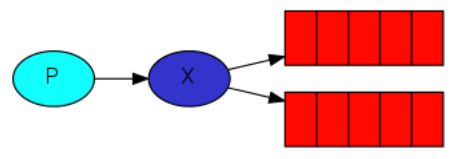
Move to directory RabbitMQ-Tutorial-Step2. Learn the next set of AMQP concepts (round-robing dispatching, durable message and message acknowledgment, message durability with durable queue and persistent message, fair dispatching with a prefetch countproducer, consumer, and queue) with the corresponding RabbitMQ tutorial page.
Here follows the picture of the architecture for this step.
At the end of your reading of the tutorial page, you can execute the example as follows:
The code of the example is in directory src/main/java/eu/telecomsudparis/rabbitmq/tutorial and the code of the test is in directory src/test/java/eu/telecomsudparis/rabbitmq/tutorial. You can also import the Maven project in your favourite JAVA IDE, e.g. Eclipse, for browsing the code of the example. In addition, observe that the test is an integration test because the name of the classe ends with IT, namely ScenarioIT.
RabbitMQ tutorial, step 3 (exchange [of type fanout], binding, and temporary queue)
This step (Step 3) and the next two steps (Steps 4 and 5) of the RabbitMQ tutorial are the most important steps in a first understanding of event-based programming with the AMQP protocol, and more especially with RabbitMQ.
Let us start with a first type of exchange: "fanout".
Move to directory RabbitMQ-Tutorial-Step3. Learn the next set of AMQP concepts (exchange [of type fanout], binding, and temporary queue) with the corresponding RabbitMQ tutorial page.
Here follows the picture of the architecture for this step.
At the end of your reading of the tutorial page, you can execute the example as follows:
The code of the example is in directory src/main/java/eu/telecomsudparis/rabbitmq/tutorial and the code of the test is in directory src/test/java/eu/telecomsudparis/rabbitmq/tutorial. You can also import the Maven project in your favourite JAVA IDE, e.g. Eclipse, for browsing the code of the example. In addition, observe that the test is an integration test because the name of the classe ends with IT, namely ScenarioIT.
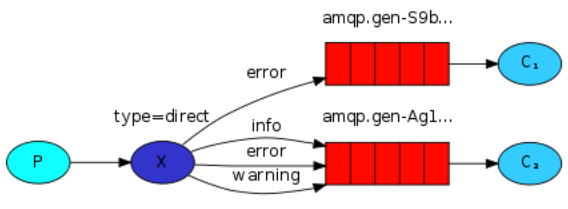
RabbitMQ, tutorial, step 4 (binding key, exchange of type direct, routing key)
Let us continue with a second type of exchange: "direct".
Move to directory RabbitMQ-Tutorial-Step4. Learn the next set of AMQP concepts (binding key, exchange of type direct, routing key) with the corresponding RabbitMQ tutorial page.
Here follows the picture of the architecture for this step.
At the end of your reading of the tutorial page, you can execute the example as follows:
The code of the example is in directory src/main/java/eu/telecomsudparis/rabbitmq/tutorial and the code of the test is in directory src/test/java/eu/telecomsudparis/rabbitmq/tutorial. You can also import the Maven project in your favourite JAVA IDE, e.g. Eclipse, for browsing the code of the example.
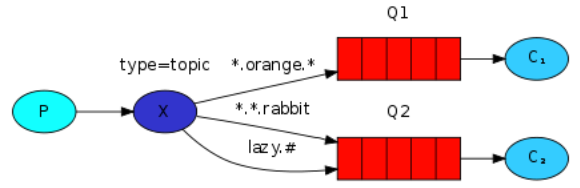
RabbitMQ tutorial, step 5 (exchange of type topic, a word in a binding key, a star in a binding key, a hash in a binding key)
Let us continue with the third and final type of exchange: "topic". This matching and routing engine is the one that fully realize the topic-based event-based paradigm.
Move to directory RabbitMQ-Tutorial-Step5. Learn the next set of AMQP concepts (exchange of type topic, a word in a binding key, a star in a binding key, a hash in a binding key) with the corresponding RabbitMQ tutorial page.
Here follows the picture of the architecture for this step.
At the end of your reading of the tutorial page, you can execute the example as follows:
The code of the example is in directory src/main/java/eu/telecomsudparis/rabbitmq/tutorial and the code of the test is in directory src/test/java/eu/telecomsudparis/rabbitmq/tutorial. You can also import the Maven project in your favourite JAVA IDE, e.g. Eclipse, for browsing the code of the example.
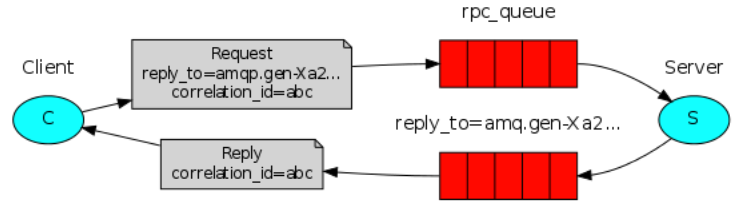
RabbitMQ tutorial, step 6 (How to realize RPC communication over topic-based DEBS with RabbitMQ)
A typical question when event-based programming with the AMQP protocol is the following one: Is it possible to "emulate" the synchronous RPC (Remote Procedure Call) paradigm with event-based asynchronous AMQP?
The answer to this question is "Yes, we can!" and it is the subject of Step 6 of the RabbitMQ tutorial:
Here follows the picture of the architecture for this step.
Move to directory RabbitMQ-Tutorial-Step6. Learn the last set of AMQP concepts (How to realize RPC communication over topic-based DEBS with RabbitMQ) with the corresponding RabbitMQ tutorial page.
The code of the example is in directory src/main/java/eu/telecomsudparis/rabbitmq/tutorial and the code of the test is in directory src/test/java/eu/telecomsudparis/rabbitmq/tutorial. You can also import the Maven project in your favourite JAVA IDE, e.g. Eclipse, for browsing the code of the example.
Contrary to what is proposed into the tutorial page, in our code, we propose three different versions:
- using the JAVA client library with the standard AMQP calls (this is the version that is presented in the tutorial page),
- using the RabbitMQ-specific class StringRpcServer,
- using the RabbitMQ-specific classes of the package com.rabbitmq.tools.jsonrpc.