Table of Contents
Git Tutorial for a local project
In this tutorial, you will learn Git basics, and you will study how to do branching and merging, which are very important when you work as a team on a project.
Installing Git
- For Linux and Unix based users, you can simply run a command to install git as http://git-scm.com/download/linux.
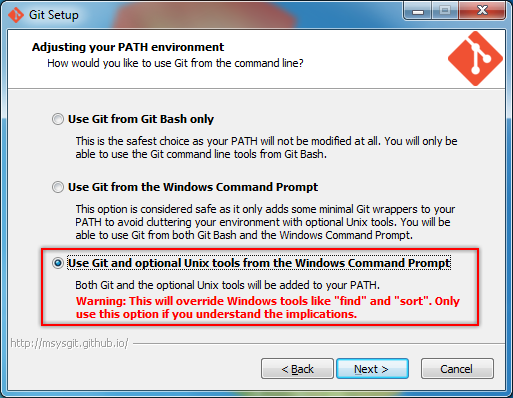
- For Windows users, navigate to http://git-scm.com/downloads to download the client. To be able to run all the Unix commands provided in this tutorial, you might want to select the option as shown in the screenshot. Otherwise, you may use cygwin.

Initializing Git Con guration
- You can introduce yourself to Git with your username and email address before doing any operation by:
$ git config --global user.name "Your Name"
$ git config --global user.email "you@example.com"
Please use your actual email because it will be used as an identification of your Git commits for remote repository in the next tutorial. This information will be written to .gitconfig under your home directory.
- To see the current username and email address on Git, you may enter the following commands:
$ git config user.name
Your Name

$ git config user.email
you@example.com
Using Git in a local project
Unlike SVN, you may use Git on your local project without any centralized server. To get started you will need to initialize a repository.
- Create a new folder for your project:
$ mkdir YOUR_PROJECT
$ cd YOUR_PROJECT
- Initialize a repository within the folder:
$ git init
Initialized empty Git repository in /YOUR_PROJECT/.git/
Now, this folder is already Git. From now on, every commit operation will put your changes into your local repository. You can copy this folder to another machine and it will work. You need to do your first commit to make this light up.
- Use your favorite text editor to create a blank text file “README.txt”. Otherwise, you may use a command to create a new text file:
$ touch README.txt
- Tell Git to track this file by add and commit:
$ git add README.txt
$ git commit -m "First commit"
[master (root-commit) 52b149c] First commit
 1 file changed, 0 insertions(+), 0 deletions(-)
 create mode 100644 README.txt
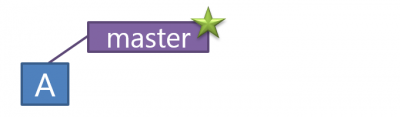
Now lets see what this visually looks like. (A) is the first commit. The default branch that gets created with Git is a branch names master. The pointer (*) means the reference to the commit that you are currently working on or what Git calls HEAD.
- Add the text “this is a README” on the first line of README.txt, for example, by a command:
$ echo this is a README > README.txt
- Then commit new changes:
$ git add README.txt
$ git commit -m "Second commit"
[master f4a9975] Second commit
 1 file changed, 1 insertion(+)
- Also, commit log can be seen by:
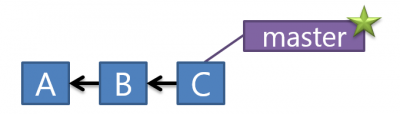
$ git log
commit f4a997566f2289c40bc8895b9f64d25ebd6613f7
Author: ***
Date:   ***

    Second commit

commit 52b149c7b167408831baed75b378ae909ed86349
Author: ***
Date:   ***

    First commit
Now lets see what this visually looks like. (B) is the second commit, master branch moves to commit (B) with the current pointer (*) along.

From log, 52b149c… represents the commit (A), while f4a9975… represents the commit (B). You may see the changes between commits by:$ git diff 52b149c...f4a9975 diff --git a/README.txt b/README.txt index e69de29..79c4409 100644 --- a/README.txt +++ b/README.txt @@ -0,0 +1 @@ +this is a README
Besides, you may switch your working commit by checkout (Note that cat is the command to view contain of file):
$ git checkout 52b149c
HEAD is now at 52b149c... First commit
$ cat README.txt

$ git checkout f4a9975
Previous HEAD position was 52b149c... First commit
HEAD is now at f4a9975... Second commit

$ cat README.txt
this is a README
Make sure that you are at the commit (B) before following the next step.
- Suppose we want to work on a bug. We start by creating a new branch for this work by checkout:
$ git checkout -b bug123
Switched to a new branch 'bug123'
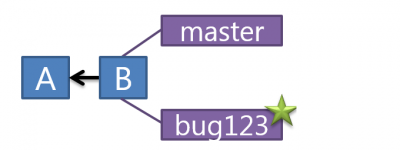
Notice that the new branch is created as a pointer to the current commit (B) and our current pointer (*) is moved to bug123 branch.
You may see your current branch by:$ git branch * bug123 master
- Append the text “fix a bug” on the second line of README.txt, for example, by a command:
$ echo fix a bug >> README.txt
You may see the changes in README.txt by:
$ cat README.txt
this is a README
fix a bug
- Then commit the changes:
$ git add README.txt
$ git commit -m "Fix bug123"
[bug123 a1bf88f] Fix bug123
 1 file changed, 1 insertion(+)
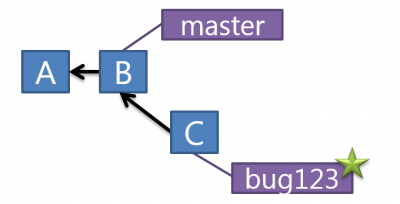
Now, this visually looks like:
You may see the changes between brunch master and bug123 by:$ git diff master..bug123 diff --git a/README.txt b/README.txt index 79c4409..2c44363 100644 --- a/README.txt +++ b/README.txt @@ -1 +1,2 @@ this is a README +fix a bug
- Let’s say the bug has been fixed, we want to merge these changes into the master branch. To do so, we first checkout to the master branch.
$ git checkout master
Switched to branch 'master'

$ git branch
  bug123
* master
Now, we switched back to master branch, the current pointer (*) is moved.

Let’s see what we have now in README.txt:$ cat README.txt this is a README
- We did not merge a bug fixed from the bug123 branch to the master brunch yet. So, we then merge from the bug123 branch, bringing those change histories together:
$ git merge bug123
Updating f4a9975..a1bf88f
Fast-forward
 README.txt | 1 +
 1 file changed, 1 insertion(+)

$ cat README.txt
this is a README
fix a bug
- And since we’re done with the bug123 branch, we can delete it by:
$ git branch -d bug123
Deleted branch bug123 (was a1bf88f).
At the end, this is what it looks like: