Table of Contents
Model, View, Controller (MVC)
In the MVC architecture, Java classes are developed as models, servlets play as controllers and JSP are views. In this tutorial, we will develop a simple MVC application based on Java servlet and JSP.
Creating Model
- Create a new Dynamic Web Project, name it servlet-jsp.
- In this project, create a new package, name it mvc.servlet.jsp.
- In this package, create a new class, name it Model.
- We will create two function to compute the square and the factorial of an integer number. Add the following codes to the Model class
	public int square (int x){
		return x*x;
	}

	public int factorial (int x) {
		if (x<0) return 0;
		int fact=1;
		for (int i=1; i<=x; i++)
			fact*=i;
		return fact;
	}
- Save the file.
Creating Controller
- Right click on the mvc.servlet.jsp package, select New→Servlet. Name it: Controller.
- Insert the following codes in the doGet(…) function
		int num = Integer.parseInt(request.getParameter("value"));
		String method = request.getParameter("method");

		Model m = new Model();

		RequestDispatcher dispatcher;
		HttpSession session = request.getSession();

		if (method.equals("square")){
			session.setAttribute("square", m.square(num));
			dispatcher = request.getRequestDispatcher("square.jsp");
		}
		else{
			session.setAttribute("factorial", m.factorial(num));
			dispatcher = request.getRequestDispatcher("factorial.jsp");
		}
		dispatcher.forward(request, response);
Creating View
- Right click on the WebContent folder, select New→JSP file. Name it index.jsp.
- Similarly create other two files: square.jsp and factorial.jsp.
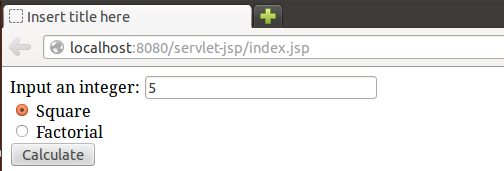
- Open the index.jsp file, insert the following codes between the <body> tags:
<form action="Controller" method="GET">
Input an integer: <input type="text" name="value"> <br>
<input type="radio" name="method" value="square" checked> Square <br>
<input type="radio" name="method" value="factorial"> Factorial<br>
<input type="submit" value="Calculate">
</form>
- Save the file.
- Open the square.jsp file, insert the following codes between the <body> tags:
Square result: <%= session.getAttribute("square") %> - Save the file.
- Open the factorial.jsp file, insert the following codes between the <body> tags:
Factorial result: <%= session.getAttribute("factorial") %> - Save the file.
Running the project
- Right click on the index.jsp file, select Run As→Run on Server.
- Type an integer number, select a method and click on Calculate, you will get the corresponding result.


Exercises
- Add a new function to the model class to generate list of random number. Add a new radio button to the index.jsp with the value “random”. Modify the Controller servlet so that when user input an integer n and select the random option, the servlet will return him a list of n random numbers.
- Create another form that have a text field to input a student name and a submit button. Create another Model that handle a list of student names. Create another Controller that receive a request from a client, call the Model to verify whether the requested name exists in the student list. If it exists, Controller responses to the client as: “present”, otherwise, it responses: “absent”.
- Create a Servlet named DispatchServlet. Create three jsp files: start.jsp (have a button in a form to call the servlet DispatchServlet); welcome.jsp (print the message “hello, new comer”) and welcomeback.jsp (print a message “hi, welcome back”). Now, add source codes to the DispatchServlet to check whether a client request is new or returned. If it is new, dispatch to the welcome.jsp otherwise dispatch to the welcomeback.jsp. (Note that: if a user open directly the welcomeback.jsp in her first access time, the DispatchServlet redirect her to the welcome.jsp) Hint: use session variable (re-look this tutorial)
