Table of Contents
Designing and running the "Request for absence" process model
In this tutorial, we will design a simple process model which presents a “Request for abscence” process. Then we deploy and execute it.
Designing your own organization
- Before designing your process models, you should define the groups and individual users.
- Start your tomcat by executing TOMCAT_HOME\bin\startup.bat (Windows) or TOMCAT_HOME\bin\startup.bat (Linux).
- Open your browser and go to http://localhost:8080/flowable-ui/.
- Login as admin with admin/test, then select IDM App→Users.
- Click on Create user to add a new user to your organization by giving Id: david, Password: david, First name: David, Last name: David, Email: david@example.com. Click Save.
- By the same way, add the user diana.

- Select IDM App→Groups.
- Click on Create group to add a new group to your organization and enter Id: employee, Name: Employee. Click Save.
- By the same way, add the group Director.

- Select the group Employee, then Click on the + add user sign to add David to the group, then click on the name after search it.
- By the same way, add the user diana in the group Director.

- Select IDM App→Privileges.
- Select Access the workflow application → Groups
- Click on Add a group, then add Director group by search it and select it.
- By the same way, add the groop Employee.

- Let begin designing the Request for absence process model!


Designing a process model
- In Flowable (http://localhost:8080/flowable-ui/), select Modeler App→Process→Create Process.
- Enter new model Model Name: Request for absence, Model Key: request_for_absence. Click Create new model.
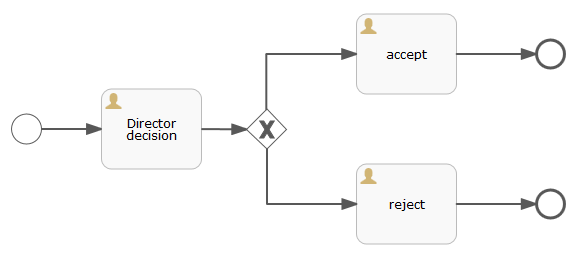
- Design a process model by drag and drop model elements, you should have something similar to this picture:

- On the start event, specify the following properties:
- Initiator: initiator
- Form reference→New form:
- Form name: Initial form
- Form key: initial_form
- Then click on Create new form.
- Drag and drop the form components:
- Date then click on the edic icon after hover the component

- lable: Absense date, Override id?:checked,Id: dateToAbsense
- Then click Close

- In the similare way add other Text:
- lable: Reason

- On the Director decision activity, specify the following properties:
- Assignment→Assignment→Candidate groups: director
- Form reference→New form:
- Form name: Initial form
- Form key: initial_form
- Then click on Create new form.
- Drag and drop the form components:
- +People then click on the edit icon after hover on the component:
- lable: Employee, Override id?:checked, Id: initiator
- In the similare way add Date, Text, and Checkbox
- lable: Absense date, Override id?:checked,Id: dateToAbsense
- lable: Reason
- lable: Approval

- On the sequence flow from Director decision to accept, specify the property Flow condition: ${approval == 'true'}
- On the sequence flow from Director decision to reject, specify the property Flow condition: ${approval == 'false'}
- On the accept activity, specify the following properties:
- Assignments→Assignment: Assigned to process initiator then click on Save - Documentation: Your absence request on ${dateToAbsense} is accepted. - On the reject activity, specify the following properties: - Assignments→Assignment: Assigned to process initiator then click on Save
- Documentation: Your absence request on ${dateToAbsense} is rejected.
- Click on Save the model icon, then click on Save and close editor.


Deploy a process model
- In the dashboard (http://localhost:8080/flowable-ui), in Modeler APP→Apps, click Create App with App definition name: Request absance, App definition key: request_absance.
- Now click on Edit included models then select your Request for absence process model, then click Close.
- Go to Save icon and check on Publish?, and click on Save.
- Now your process model is ready to be executed! Next section will show you how to execute such process model.
- Note that if you want to modify your process model, make sure to re-publish your process model by doing the same steps.
Executing a process model
- Logout and login as employee with david/david, then select Request absance→Processes→ + Start a process.
- Select your Request for absence process model, then click on Start process.
- Fill the information when and why David will be absent, then click Start process.

- Go to Processes→Select your running process → Show diagram to see the status of your executing process.

As you can see, now the current task is Director decision which needed to be handled by a director. - Logout and login as director with diana/diana, then select Request absance→Tasks. In case no tasks in the list you can check the filter and change the ASSIGNMENT to Tasks zhere I am one of the candidates.
- Select the process instance, and Click the Claim button to handle the task. Decide if you want to approve this absence request by checking Approval, then click the Complete task button.

- Logout and login as employee with david/david, then go to Request absance→Processes → Select you process → Show diagram to see the status of your executing process.

- Select Tasks→Inbox to see the result of your absence request, then click on Complete task button to end this process.


Exercices
- Remove the form property dateToAbsense and replace by two form properties absenseFrom and absenseTo. Execute the process again.
- Re-create the process model with the use of gateway:
Execute the process again.

